 This was my first attempt making scones after watching the 'Excellent Chef Series - Ah Jiao' on AFC. This has been one of my favourite cooking programmes recently as I can learn a lot on basic baking techniques which are clearly explained and demonstrated by the experienced professional baking instructor. I just could not wait to do this project after watching the show.
My daughter enjoys baking with me or just getting herself involved in one or more age-appropriate tasks like gathering the equipment, measuring the ingredients, whisking the eggs, mixing the batter, kneading and rolling out the dough and etc in the whole baking process. I love and enjoy doing each project with her and that we have an addition of P in the family now, he is somehow our faithful audience at the moment, I am sure in no time he will be able to join in the fun and make a mess together with us :).
This is an appropriate and fun baking project for kids under six years old. They could probably get involved and do everything on their own with little help from their mummies from A - Z. This is a much fun project for kids as compared to muffins baking. The latter probably required a kid to do a lot of mixing and folding in the ingredients and perhaps scooping the batter to the muffin cases as the last step. Scones baking with this technique is more fun, interesting and achievable for their age. Each step is so different from the other from the beginning till the end and that really thrills the kids and breaks the monotony of baking in most times which required just mixing, folding and scooping!!
I got C involved throughout as much as possible and she had great fun. I could tell that she enjoyed doing this much more than baking muffins. She got to do the following :
- gather the equipment
- measure ingredients
- mix the dry ingredients well
- cut in the butter to the dry ingredients using scraper (a new tool introduced to her)
- make a well of the dry ingredients and pour in the wet ones in the centre and mix them around (or make a mess!! :)
- scrape and press the batter to form a dough
- roll the dough with rolling pin
- cut the dough with round cookies cutter (fun, fun, fun!!)
- transfer cut dough to the baking tray
- continue to create her creations using the balance of the dough (mess, mess, mess!!)
The ingredients are easy to get and it is an action-filled baking project throughout the process and I do highly recommend parents to do this baking project with your kids.
 I demonstrated to her once and she did it on her own for most of the steps. In fact she was so impatient when I tried to explain to her the reason behind each step that we did. She was mixing around the dry ingredients using the scraper.
 She was half way cutting in the butter to the dry ingredients when I asked her to post and I took a picture of her. Cheesezzz!!
 This was the end result of the dry ingredients after cutting in the butter. It should look crumbly like this.
 Making a well in the centre to make way for the wet ingredients to be combined together with the dry ones.
 Cutting out the scones using the 3cm in diameter cookie cutter. She enjoyed this part very much as you can tell by her grin and her post :).
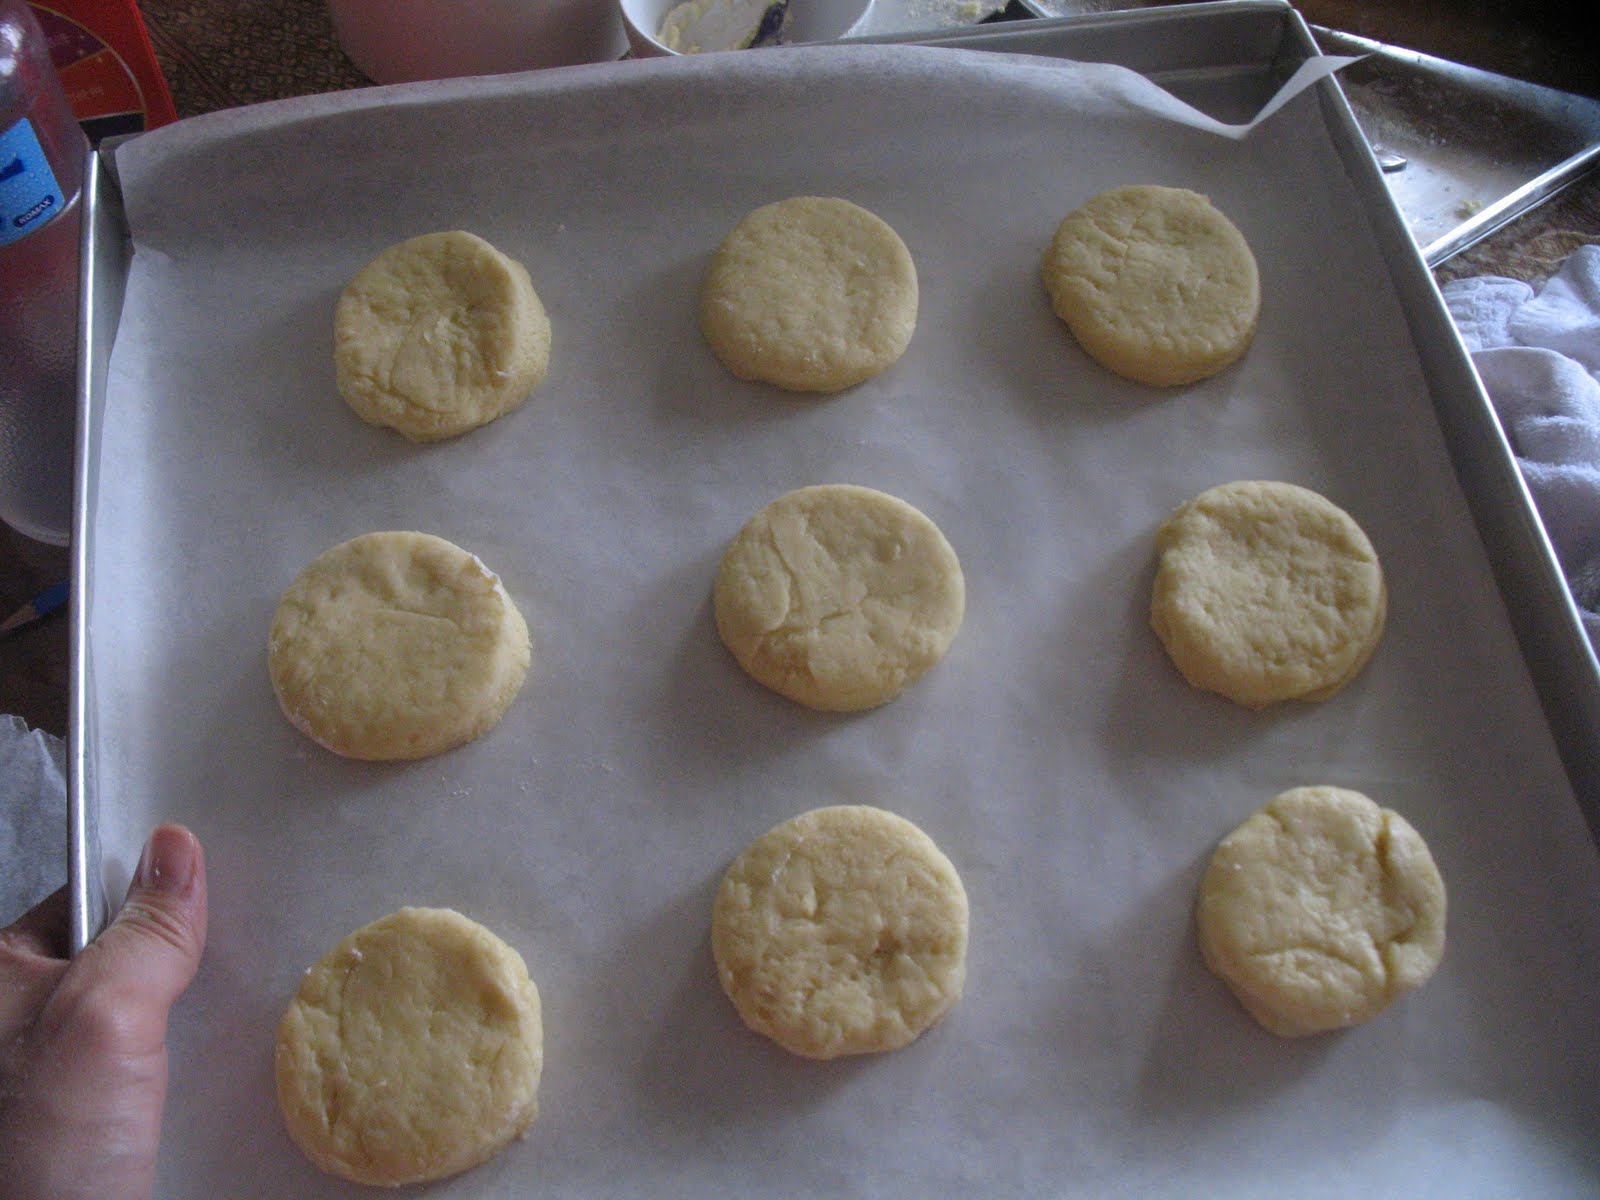 The cut-out scones being arranged nicely on the tray.
Basic Scones
Ingredients
Dry ingredients:
250g cake flour
25g milk powder
35g sugar
1.5 teaspoon baking powder
1 tsp salt
Wet ingredient:
1 whole egg (room temperature)
70g water
80g butter
Method
1. Preheat oven to 180 deg C/350 deg F. Line the baking tray with baking parchment
1. Preheat oven to 180 deg C/350 deg F. Line the baking tray with baking parchment
2. Mix thoroughly all the dry ingredients with the scraper. I think we could also do this by using a whisk if u are doing it in a bowl but according to the instructor it is butter to do this on a flat surface to prepare for the next step.
3. Gently cut butter into the dry ingredients. Make sure that u cut and scrape in the flour many times and it should be crumbly at the final stage for this step.
4. Make a well in the centre and pour in the wet ingredients. Slowly scrape inwards using a small spoon from the inner edge of the well to the centre and swirl to mix well. Repeat the steps until the wet ones are well incorporated.
5. Use scraper to scrape with your dominant hand and gently use your non-dominant palm to press the dough. Do this for a few times until all are well combined but do not over mix the dough otherwise gluten will form and the scones will be hard and not soft and fluffy.
6. At this stage the dough will be sticky. Sprinkle a little flour on the counter top, rolling pin and the sticky dough if you want to roll and cut the dough and bake straight away. Otherwise wrap dough in clingwrap and pop it in the fridge for a good 30 minutes to let it relax so that it will be manageable by then.
7. Roll it to about 1.5cm to 2cm thick and cut it out using round shape cookies cutter.
8. Bake for about 25 minutes.
Notes :
Notes :
1. According to the instructor, you could use any type of flour you have in your shelves except high protein flour.
2. I rerolled the dough for 2 times and the recipe yields 9 scones using 3cm in diameter round shape cutter.
3. Serve the scones warm with butter and fruit jam. They are so delicious that I bake them twice last weekend!
4. I took some video of C for this project hopefully I could have time to edit them and post up to share with you.


