Thursday, August 20, 2009

Mini Strawberries & Chocolate Chips Muffin


I had a little 'free' time this morning, so I thought I could quickly whip up a tray of muffins rich in strawberries flavour by using the balance of the strawberries milk and yogurt in the fridge. At the same time, I was really excited each time getting my daughter involved in my baking projects. She loves helping me to crack eggs, add in the different ingredient and do the mixing. Watching her stirring gently the batter amazed me! It is so wonderful to see her so happy doing all small little things together with me in the kitchen each time!

I didn't refer to any particular recipe but just recalling the ingredients and the volume used for the sunny morning muffins. I think they are still in my head as I had baked them not long ago.. I hope :) I substituted the orange juice with the strawberries milk and maintain the amount for most of the ingredients used except the walnuts and other fruits. I made a mistake here. I should have increased the volume for the strawberries milk since the chocolate chips that I added in to the muffins were dry and create no moist as compared to the strawberries juice and blueberries for the sunny morning muffins!

The muffins were heavy and a little bit dry. I would not pose the recipe here as I think it wasn't a success project. Nevertheless, the consolations that I had were that they looked really cute, sweet and adorable in the pink mini muffin cases and that my dear husband and daughter liked them!! Think they didn't mind the heavy texture nor the cakey one :)

Tuesday, August 18, 2009

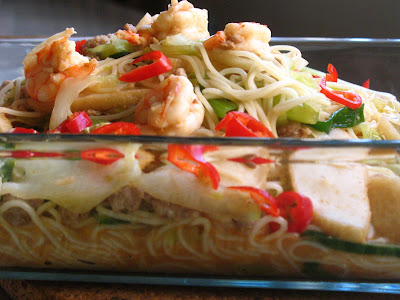
Fried Angel Hair ala Peranakan


We are supposed to have spaghetti with mushroom tomato sauce on Sunday but my husband mistook the angel hair with spaghetti. So we had that for our Sunday's dinner. I didn't know how to estimate the amount for the three of us so I ended us cooking more than what we could finish! I was thinking hard what was I supposed to do with the balance boiled angel hair that was still sitting in the fridge. I wish to have something Asian for today's dinner and cleared the balance of the noodles. I decided to fry the angel hair Ala Peranakan.

If you are a die hard fan of yellow noodles which the original Peranakan fried noodles should be, you may not like this dish as much. All the three of us aren't so I thought of giving it a try and fry it following the peranakan fried noodles recipe. It tasted very good as the angel hair didn't absorb the gravy as much and as quickly as compared to the yellow noodles. The noodles were not soggy nor dry even if you were to consume much later. As the taste of the angel hair is light it didn't spoil or deviate much from the original taste!! In fact to me I think it gives the traditional recipe a twist of new taste. I will cook this again as my daughter and husband like this much more than the authentic peranakan fried noodle!!

Ingredients (for 3 pax)
8 pcs of prawn
24 prawn heads
1 tbsp of salted soya bean paste
1 palm size fish cake (sliced)
3 tbsp of minced pork
2 stalks of off spring leaves (cut into 2 inch length)
8 slices of Chinese cabbage (chopped)
1 red chili (chopped for garnish)
2 cloves of garlic

Method
1. Boiled the prawn heads with 1 cup of water for about 20 minutes and leave aside for stock later

2. Fry the garlic and bean paste until fragrant

3. Add the minced meat and continue to stir fry. Add in the prawn and fry for about 30 seconds.

4. Add in the cabbage and the spring leaves. Continue to fry for a while.

5. Add in the fish cake and the stock and let it boil.

6. Season to taste.

7. Add in the noodles and stir fry for another 30 seconds.

8. Garnish with chopped red chili.

Notes:
1. The authentic peranakan fried noodle calls for shallot paste instead of garlic but to make my job easier and since I don't have any more shallots left at home, I just improvise!

2. The original recipe will taste much better with chye sim instead of cabbage and uses the pork belly rather than minced pork.

3. Needless to say it is best to eat the original one with 'belacan' = shrimp paste chili but not for this new dish which i think best to eat just with chopped chilli!

Pancakes with Blueberries & Strawberries Syrup


I still have craving for blueberries and bought another two punnets from the supermarket since they are having discount now. Never planned to cook this simple meal for breakfast. It was very impromptu as I was lazy to go out to get breakfast this morning. Thought of making strawberries syrup as there were still some balance in the fridge. My daughter and I love the blueberries syrup a lot. The only drawback was that the pancakes were not fluffy enough as I didn't add enough baking powder to the pancake batter. Just wanna to use less chemical ingredients as possible at home! :)

Ingredients :
Pancakes
1 cup of plain flour
1/4 baking powder
1 egg
1 tbsp grapeseed oil
1 tbsp castor sugar
1/2 cup of milk

Blueberries syrup
125g blueberries
1 tbsp sugar
1/4 of water
1/4 tsp cornstarch
(Cook all ingredients in a saucepan and add cornstarch the last to thicken the syrup)

Strawberries syrup
4 - 5 pcs of strawberries (chopped)
1 tbsp sugar
(Add sugar to the chopped strawberries and let it rest for half an hour until the juice is oozed out)

Method
1. Mix all ingredients (except oil) for pancakes for about 1 hour and let it rest in the fridge.
2. Add in the oil and stir well just before frying the pancakes
3. Use a ladle and scoop the batter to the non stick frying pan. Flip the pancake over when the bubbles stop forming
4. Cook for another 30seconds to 1 minute and serve hot with your preferred syrup!


Wednesday, August 12, 2009

Sunny Morning Muffins


I bought some bananas, strawberries and blueberries over the weekend and happened to stumble to the Food Network.com website when I was searching for other blueberries recipes. The craving for blueberries is still lingering in me!! I baked the muffins following the recipe this morning for our breakfast. My husband and I both ate 5 each. My daughter enjoyed it very much too and she has it again for her snack later in the day at school. I thought of freezing some for snacks for the week but they are too good to resist or keep for the rest of the week. You just can't stop eating them especially when they were just out from the oven!!. It tasted so good that I know I will bake it time and again. What's more it is healthy and smart way to get the children eating more fruits and use up whatever balance of fruits you have in the fridge.


The muffins are moist not dense, fruity, fragrant with the mixture of berries, bananas, lemon and they are nutty. The light cinnamon and nutmeg spices blended in extremely well with the fruity flavours of the muffins. The taste of the strawberries, blueberries, bananas, lemon is significant by itself but none is overpowering the other. It was really a balance and a good combination!!

Sunny Morning Muffins

Ingredients

Wet ingredients:
1 cup strawberries, chopped and mixed with 2 tablespoon of sugar.
1 cup of sugar
1 ripe banana, mashed
2 large egg (room temp)
1/4 cup vegetable oil/ 56g melted butter
1 lemon, zested

Dry ingredients:
1 1/2 cup of flour
1/2 tsp baking soda
1 tsp salt
pinch of ground cinnamon
1/4 tsp of ground nutmeg

Fold in :
1/2 pint or about 1 cup of blueberries
1 cupped of chopped walnut

Method

1. Preheat oven to 180 deg C/350 deg F. Line the muffin tray with muffin cases

2. Mixed the chopped strawberries with the sugar and leave it aside for at least 15minutes to let the juice out.

3. In a mixing bowl, sift the flour with baking soda, cinnamon, nutmeg, salt.

4. Melt the butter (if you are using butter) and leave it cool to room temp. In a medium size mixing bowl mix the butter with egg, banana, lemon, sugar and strawberries.

5. Add the dry ingredients in 3 batches to the wet ingredients until just combine.

6. Fold in the blueberries and walnut and fill the batter 2/3 full in each muffin cases.

7. Bake for about 30 minutes*1

Notes:
*1. I have increased the baking time to 50 minutes as I find that the muffins are still very wet at 30 minutes.

2. The amt of salt is high compared to other muffin recipe but it wasn't salty at all.

3. May try to use more lemon zest if you prefer strong lemon flavour. I may try to substitute the lemon with orange zest and I think the muffins will turn out nice too! :)

4. I divided the batter into 2 as I want to make some without walnuts as I know she didn't know how to eat them

5. Both version i.e with or without walnuts taste as good. I love both infact i find the ones without walnuts are more intense for the fruity flavours.

6. Sprinkle some walnuts as topping if you prefer.

7. The muffins are flat and perhaps due to the fruity ingredients.

Tuesday, August 11, 2009

Blueberries Yogurt Muffins II


I have craving for blueberries lately. I bought 2 punnets of blueberries and intended to use one of the punnet to bake a tray of blueberries muffins. I came across this blog which has now become my favourite cooking and baking blog. I refer this site for the recipe but yet again I didn't follow it exactly as I didn't want to have a dense and heavy muffins this time. So I thought of not using the 2 mixing bowls method but creaming one instead. I have also replaced the vegetable oil with butter though not as healthy but I just have the craving for light buttery muffins. I did a comparison of this recipe with the one which I did sometimes ago. The ingredients used are almost similiar except that this recipe replaced the full cream milk with orange juice, added the vanilla flavour and used less one egg. As for the topping, I used about 5 tablespoons of flour with 2 tablespoon of butter and about 1/4 cup of brown sugar mixed with nutmeg and cinnamon.

The muffins were moist, soft, cakey and light with strong blueberries flavour!! I would said that this is an improved recipe from my previous experiment. Yummy! Yummy!!

Blueberries Yogurt Muffins

Ingredients

220g / 2cups of plain flour
170g brown sugar
1 tsp baking powder
1 tsp baking soda
1/4 tsp salt
(Sift the dry ingredients together)

1/4 cup of freshly squeezed orange juice
56g unsalted butter (room temp) or 2 tbsp vegetable oil
1 tsp vanilla extract
1 cup vanilla yogurt
2 large eggs(room temp)
250g blueberries

Topping :
5 tbsp plain flour
2 tbsp cold butter
1/4 cup brown sugar
Cinnamon & nutmeg (to your liking)

Method

1. Preheat oven to 190 deg C. Line the muffin tray with muffins casing.

2. Cream the butter and sugar until light, pale and fluffy. Add in the egg one by one and then vanilla essence follow by the yogurt and orange juice.

3. Lower the speed of the mixer and add in the sifted dried ingredients in three batches until just incorporated. Do not overmix.

4. Fold in the blueberries in 3 batches. Do this gently and fast.

5. Using 2 spoons, fill the muffin cups 2/3 full.

6. Bake in the oven for about 18 - 20 minutes until a skewer came out clean when inserted to the muffins.

Monday, August 10, 2009

Homemade Popcorn Chicken


I was thinking very hard what I should do with the small packet of minced chicken that I bought from NTUC Fair Price (local supermarket). I knew I would definitely use a small portion of it for my stir fried mixed vegetables. I decided to cook popcorn chicken at the end using some of the balance cornflakes that I have in the fridge. I have never cooked this dish from scratch before and this was really an experiment. What I did was just marinate the minced chicken with a generous amount of salt, ground white pepper and cornflour. I then scooped a teaspoon of marinated minced chicken and coat it well with the crushed cornflakes. Bake them in oven at about 180deg C for about 20 minutes. Turn the popcorn chicken over after the first 10minutes of baking.

My daughter loves the popcorn chicken a lot and obviously I didn't cook it enough for everyone as this is really an unplanned dish. She demanded to have this as snacks for her tea break at school! I will cook this dish times and again as it is so simple, easy, fresh and healthy.

Mama Pork Chop


Today is a public holiday in Singapore. My husband is busy rushing out some documentation for a new project. I was having very bad tension headaches again and had not been sleeping well past few nites due to it and the pregnancy. So, we both decided to stay home and keep the activities minimum and simple with our daughter. My husband likes to cook some of his favourite dishes whenever he is inspired to fill our stomachs with love his ways. Frankly he cooks quite good pork chop and 'begedel' (potato croquette). In fact, he has tried many different flavours and versions of the latter. The original gravy's recipe for the pork chop was from his late grandmother but he changed and added new flavours to the original. That inspired me to name this special simple dish after my late grand-mother-in-law. My husbanf and I enjoyed the time spent together cooking in the kitchen, chatting away and at the same time kept our daughter involved and occupied with simple activites like peeling snowpeas, crushing the crakers etc.


I cooked a simple stir fried mixed vegetables with prawn and pork as a side dish. I just wanted to add vege to the main course to balance back my duaghter's diet for the past one week as she has not been eating much vegetables since she was sicked. I am so happy to see her enjoying her snowpeas, carrots and baby corns. Of course she loves the pork chop too!! I reintroduced the snowpeas (yesterday) and baby corns to her today though both were rejected a few times previously. As a mother, I am so pleased to see her finishing up the vegetables. She is a vege lovers since young but has her own preferences somehow. I am in particularly lazy today and changed my mind to have just bread and butter instead of rice or mash potatoes with the pork chop. It was a simple yet delicious meal we have had together

Wednesday, July 1, 2009

Avocado Cheesecake


I made this 3kg cheesecake for my Godmother. I didn't know till she told me that she is a cheesecake lover! I have been browsing around some baking books and sites on cheesecakes. I am quite hesitant to make a non-bake cheesecake whenever there are children around since the cakes will normally call for fresh eggs which may be harmful to kids due to the presence of salmonella bacteria in the eggs. I find lemon, mango, orange and even chocolate cheesecake is quite common. I decided to go for this recipe due to the nutritional values of avocado and was really curios on how it will turn out as avocados by nature are quite bland in taste.


The original recipe did not call for a sponge. I was concern that without the sponge it may not able to give the good height for a birthday cake should be. I decided to follow another recipe to bake a sponge for my cheesecake. I had baked this sponge for my trial on mango cheesecake before so I was pretty sure that this sponge recipe would work out fine in terms of height, volume and texture. As I predicted it did turn out well!

The only thing that I overlooked was that I should have increased the volume for the avocado cream cheese filling. As you can see in the 2nd picture, the avocado cream cheese filling was thin for all layers. The sponge layers were thick and had somehow overshadowed the taste of the avocado cream cheese.... an outcome that was so unexpected! I was doing the layering and creaming midnight so just could not do anything to add the cream cheese volume in the wee hours :(

I did the cake in 2 days' times. I baked the sponge on the first day. On the second day I did the creaming and assembling. I like to spread out the tasks this way in order not to stress myself up as I still need to take care of my daughter :)

AVOCADO CHEESECAKE

Ingredients

Base:
110g butter diced
200g finely crushed digestive biscuits
2 tbsp brown sugar
40g toasted and chopped shelled pistachios
35g chopped pumpkin seeds

Filling
500g Cream Cheese (room temp)
140g Castor sugar
1tbsp lemon juice
1/2 vanilla essence
450g avocado puree
1 1/2 tbsp + 1 tsp powdered gelatine dissolved in 100ml water
300ml Thickened cream/ Heavy cream

Topping
Whipped cream
50g rough chopped pumpkin seeds
100g toasted and chopped shelled pistachios


Method to make biscuit base

1. Melt butter in pan over low heat. Stir in the rest of the ingredients and mix well. Fry until fragrant.

2. Pressed into a greased 23-cm loosed bottom cake pan/ springform cake pan with the back of a metal spoon or with your hand.

3. Cover cake pan and refrigerate for 30 min.

Method to make filing

1. Beat cream cheese, sugar, lemon, vanilla until smooth. Beat in avocado puree. Set aside.

2. Pour gelatine into cream cheese and mix until combined. Blend in cream.

3. Divide the filling into 3 bowls. Pour in the first layer of cream on the biscuit base. Stack the first layer of sponge on the cream. Repeat the same process ending with cream filling covering the end layer of sponge.

4. Cover with cling wrap and refrigerate for at least 6 hours for the cake to set.

5. Transfer the cheesecake to a cake board and decorate with whipped cream, pumpkin seeds and pistachios. Chilled before serving.

Note :
1. Increase the volume of the filling if you intend to add a sponge in the cake~

2. I used the loose bottomed cake pan since i didn't have the springform cake pan.

3. Wrapped the bottom of the pan with a cling wrap. This will help to ease the transfering process of the cake from the pan to the cake board without tearing the biscuits base. If you know any other better method of transfering please do share with me.

4. Decorate with whipped cream the last.

5. Roast pistachios in advance.

6. Use room temp cream cheese otherwise the mixture will be lumpy.

7. I will share with you the recipe on how to make a suitable sponge for cheesecake in another post.

8. If you ever know how to choose a ripe avocado please do share with me :)


The recipe was extracted from Cheesecake Seduction

Chocolate Ganache


I made this chocolate ganache as my family Christmas dessert last year. I was in Kuala Lumpur Malaysia, my hometown for 2 weeks. Spent great deal of time having fun and catching up with family members there. I was very thankful to my dad and my brother for sending my daughter and I back to Singapore. I was also in particular happy to see my dad enjoying himself with the company of my daughter, his grand-daughter.. My dad is a man with few words and sometimes all of my siblings including me have difficulties in understanding his thoughts and feelings. But we know he is a kind and responsible man and infact too responsible until sometimes cause headaches in the family :) Whatever it is we love him and we know he loves us too!
I was cooking 2 of my favourite dishes; the Indian curry chicken and a simple roasted chicken with lots of garlics, rosemary and butter for a simple family gathering. Decided to cook these dishes as I didn't have much time to prepare as I reached Singapore only 2 days before Christmas. So thought of doing something that I am familiar with. As for the dessert, I must admit that I am ambitious and daring to try on the new recipe for an important family gathering! Praise the Lord! Everything turned out find.

I got the 2 Christmas figurines when I was attending a baking workshop so they have become the centre pieces. Frankly the cake did not look appealing in the picture but it really tasted wonderful!. Take a small bite of the cake and let it sit in your tongue for a moment. Let your natural enzymes did the rest of the work... dissolving the cake bit by bit and you will enjoy the strong and smooth chocolaty punch flowing slowly from your mouth to your throat before ending in your stomach!! The berries cut the sweetness of the cake and create great balance of this dessert!

CHOCOLATE GANACHE

Ingredients

1/3 cup / 35g cocoa powder
1/3 cup/ 80ml hot water
150g dark eating chocolate
150g butter, chopped
1 1/3 cups (300g) firmly packed brown sugar
1 cup / 125 g almond meal
4 eggs, separated
240g fresh blueberries

chocolate ganache
200g dark eating chocolate, chopped
2/3 cup (160ml thickened cream)

1. Preheat oven to 160 deg C. Grease deep 22cm round cake bine, line the base and side.

2. Blend cocoa powder with hot water in small bowl until smooth.

3. Combine chocolate and butter in medium heatproof bowl over saucepan of simmering water, stir until melted. Remove from heat and stir in cocoa mixture, sugar, almond meal and egg yolks

4. Beat egg whites in clean small bowl until soft peaks form, fold into chocolate mixture in 2 batches. Pour mixture into prepared pan.

5. Bake in oven for 1 hour and 15 minutes. Stand cake in pan for 15 min before turning onto wire raxk to cool.

6. Arrange berries on cake, pour ganache over cake to partically cover berries. Stand at room temperature until set.

Method to make the ganache:

1. Combine chocolate with cream and stir over lower heat until smooth.


Method

1. Preheat oven to 180 deg C/350 deg F. Grease and baseline an 8inch cake pan.

Notes :

1. This cake can make up to 3 days in advance. Store it in air tight container

2. The actual recipe called for raspberries. I am sure the cake looks much better with raspberries on top than blueberries as the latter did not bring out the colour of the cake.

3. Top with berries and chocolate ganache when you are ready to serve.

4. I find this recipe easy to make and fast but you need to plan ahead as the baking time is quite long.

5. It is suitable for special occasion due to the exotic chocolaty taste and also its gorgeous look, only if you able to find the right ingredient to decorate though!


This recipe was extracted from The Australian Women's Weekly.

Easy Chocolate Cookies


I was curious about piping at one point in time last year. Decided to make this simple recipe so that I can put the new piping bags and tips in use. Though the recipe was rather simple, it wasn't something I like. Infact I find the smell of cocoa powder rather weird without mixing some chocolate into the recipe. Perhaps because I am a chocoholic I find the recipe is too light and not to my liking.

However, if I didn't remember wrongly this was my very first time doing cookies piping. It was fun though to get different star shapes out from the same star-shaped nozzle with different pressures, angles and heights. It was quite a mess as I didn't know how to fill up the piping bag at that point. Anyway it was a good experience for an amateur like me to get a feel on how to work with some of the piping utensils.

EASY CHOCHOLATE COOKIES

Ingredients

200g butter/magarine
80g icing usgar
1/2 egg
1/2 tsp vanilla essense
210g plain flour
15g cocoa powder, sifted

some chocolate chips for decoration

Method

1. Cream butter and icing sugar till just combined.

2. Add egg, vanilla and mix well.

3. Fold in flour and cocoa powder.

4. Put mixture into a piping bag fitted in with a star nozzle. Pipe dough onto a greased and lined baking sheet and decorate with a chocolate chip in the centre.

5. Bake in a preheated overn at 180deg C for about 20min. Remove and leave to cool.

Notes
1. The cookies would not expand as not leavening agents are added in. So we can safely pipe the cookies near to each other.

2. Fill the piping bag hall full so that you can have better control when you pipe out the cookies. Shake your bag and give a few twists to 'lock' the dough in the bag

3. Do not put the nozzle too near to the baking sheet as this will leave not enough room to pipe out nice star shaped cookies. Too far will cause the cookies dough flow out too long and it would be nice looking.

4. I was silly to put the flat bottom of the chocolate chips facing up. Realised it looked rather weird after half way through:)

Cocoa Oatmeal Cookies


I am very upset to find out that the DVD that I have copied in all my cooking and baking pictures was able to only retrieve none!! There are a lot of photos taken for many of my experiments but have yet been posted for sharing in my blog :(( Begging my hubby to salvage the dics and hopefully he or someone can help to retrieve all the data... still crossing my fingers! The lost taught me a good lesson that is store your data well and always if possible don't delay your blog posting!

The pictures of this post and perhaps a few of the coming subsequent posts were saved as draft sometime ago or in another drives if you are wondering where are the pictures coming from. I could not remember where I got this recipe.

I am never good in baking cookies though it is the simplest baking project we could always do with our kids. I always need to increase the baking time or oven temperature than recommended. I discovered this after a few trials.

My husband and daughter love cookies a lot but I don't bake often as I think we should have these as treats. This is quite a wholesome recipe for older kids and it tasted semi-chewy due to the raisin and oatmeal but definitely not gummy type. It is crunchy somehow and tasty however may not be so suitable for too young kids unless you chop the raisins and blend the rolled oats into smaller parts. If you like semi chewy yet crunchy and chocolate flavoured cookies, you perhaps will like this!

The recipe below will yield about 48 cookies.

Cocoa Oatmeal Cookies

Ingredients

1 cup/ 223g unsalted butter (softened)
1 cup/ 220g brown sugar
2 eggs
1 tsp vanilla essense
1 1/2 (190g) cups all purpose flour (sifted)
1/3 cup unsweetened cocoa powder
1 tsp baking soda
1/2 tsp salt
3 cups/ 245g rolled oats
1 cup/ 145g raisin

Method

1. Preheat oven to 175deg C. Grease and line the baking tray.

2. Cream butter and sugar

3. Add eggs one at a time and vanilla essense and continue to beat well.

4. Add flour, baking soda and cocoa powder and continue to beat until incorporated.

5. Stir in oats and raisin and mix well.

6. Drop one tbsp of dough on the baking tray and gently press using the bake of the fork.

7. Bake for 10-12 minutes.

Notes
1. I have used about 170g brown sugar and 50 Castor sugar as I didn't have enough brown sugar in the cupboard.

2. I have also added chocolate chips into the recipe just to give a better texture and enhance the chocolaty flavour.

3. I have used about 1 cup (120g) whole wheat flour and 1/2 cup (70g) of all purpose flour to make them more wholesome.

<

Monday, May 11, 2009

Stir Fried Black Pepper Shabu-Shabu

I cooked this stir fried black pepper shabu shabu a day after Chap Goh Mei (the 15th day of the Chinese New Year). We bought quite a lot of shabu shabu worrying that it would not be enough to serve our guests during the reunion dinner. It ended up that we have more than enough and plentiful of different variety of vegetables, mushrooms, seafood, meatballs, meat and etc for the steam boat. It was a good catch up, fellowship and feast!!

I gave the balance of the shabu shabu a little twist by stir frying it with just carrots (leftover) and ready made black pepper sauce that you can get it on shelves anywhere in our local supermarket. Shabu shabu is best to be eaten on the day you get them back from the supermarket and when it is still fresh. I personally like spicy food and do not prefer meaty flavoured stuff so thought of covering the original meaty flavour of the shabu shabu just in case it was as fresh as a day before, using black pepper sauce.

My husband would prefer the simple original taste of this meat and I guest meat lovers will enjoy the original simple juicy taste of this meat by just dipping it in the flavourful stock and tuck in immediately.

Workshop at Phoon Huat

I attended a workshop at Phoon Huat in mid June last year. That was my first baking class upon the discovery of my interest in baking. I paid about S$36.00 for the hands-on half a day class and it was really an eye-opener for me into the baking world.

I came half an hour early at this Phoon Huat's Geylang Branch and was very delighted to see for the first time all baking supplies, ingredients, equipment all available under one roof. To my pleasant surprise I was also able to peep into one workshop classroom whereby the pastry chef was busy arranging some baking utensils and then decorating some cupcakes while waiting for the next class to begin. I wasn't attending his class. I went into the classroom next to his and pick a table since I was the early few 'aunties'. All 4 sides of this classroom were packed with industrial mixers, ovens, racks storing all the baking utensils and ingredients, fridge etc, leaving a small opener for the glass door as entrance.

An auntie sitting next to me began settling down and digging out the spatulas, measuring cups, spoons, bowls, etc weighing scale and started to do the washing. She then proceeded to select her 'favourite' mixer (there were about ten industrial mixers), unlocking it and continue with her washing. I rolled my eyes and was wondering why she knew what to do and what was she doing! I began to asked and she told me, "I am the regular here". Nodding my head, I grinned and later doing the same things that she did when attendees started to stroll in one by one and most knew what to do exactly like her!

The instrutor came in resting half of his butts on the kitchen top, introducing himself and started distributing and reciting the first recipe step by step. I was trying best of my very best to understand his explanation and instruction but still was lost in between. Urrrh, i told myself, 'Nevermind, just listen first and follow the flow later loh'. After finished reciting the steps and explaining them, the instructor told us to select the mixer, take out the necessary 'barang-barang' = items from the drawer, collect the ingredients at his table top and proceed with the recipe.

Luckily I was paired with a local Chinese lady who happened to came back from Shanghai for a holiday and she bakes quite often and know the basic stuff quite well. She was like my angel of the rest of the day as I was 'blind' in baking!!

The instructor may look aloof to me but I know he knows his stuff well from his answers to the questions being asked. Perhaps he has done this too many times until he is getting a little 'sian'=boring.

Personally this workshop is worth attending as I did learn how to make these two recipes well, knowing what and what not to do/use/buy from the instructor, learning how to operate the mixer that is different from what we usually have at home and etc.

The most worth for money attending this class was that all ingredients are provided and we got to bring home the baking products at the end of the day. I brought back 6 cups of tiramisu deserts and one about 7 inch oats crumble.

My family was delighted to be able to taste my hand-bake products that tasted really like professional!! Kudos to Phoon Huat!


Chicken Pie

It has been very tiring these 2 months and I don't feel like writing about anything else. In most of the times, last 3 months I can see myself getting 'lazier' and what I really wanted to do everyday is doing nothing....not even reading other blogs or updating my own ones :( I am expecting my second baby and into my 14 months of pregnancy now. Morning sickness has much subsided but the tension headaches are picking up. Hopefully all the symptoms will go soon.

These chicken pies were done a while ago by my mother-in-law. I just gave her minimum help in filling up the pies with potato mushroom chicken, brushing the pies with egg wash, operating the oven and doing some housekeeping works. She made the beautiful rose and I contributed the two petals of leaves..hehehe. We decorated one while leaving the rest simple.

I personally feel that this pie looks really gorgeous and tasty! Notice the side of the pie crust that puffed up much higher.. that is what i am looking forward to!


We bought instant puff pastry from Giant Supermarket. What you need to do is just take this pastry out from the fridge and roll it immediately to the size of your likings. This made the job pretty easy and fast. Follow the instructions in the box on how to roll and how long should you bake the pie... We added about another 15-20 minutes to the time suggested, just to get the brownish crisp look!


What you really got to do is to spend a little time before hand to cook the fillings. We decided to do the potato mushroom chicken filling as that is everyone's favourite and above all it is not spicy and my daughter loves it a lot!!

Notes:
1. Do not strecth the pastry to thin as it will shrink in high heat and cause the gravy of your filling to flow out.

2. Make the top pie cover slightly bigger than the pie mould to avoid spilling

3. Gently prick the bottom pie pastry with a fork before filling it up.

4. Use the back of the fork to gently press at the side around the pie cover.


Received a comment from the administrator from foodista and am pleased to be invited to link to their chicken pot pie recipe Chicken Pot Pie on Foodista

Wednesday, February 25, 2009

Open Pineapple Tarts II


Alas the 2009 Chinese New Year was over! Really could not imagine how I managed my time last whole month in doing plentiful of housework, cooking, baking, visiting, traveling and gathering. Indeed it was very tiring but I feel so satisfied and happy going through this process each year. This year was a different experience altogether compared to last few years as I welcomed the year through baking of pineapple tarts and cookies which I never did before.

I learnt the hard way on how to store the tarts and cookies. I should have gotten the containers ready at hand. The containers were out of stocks at all hardware shops in the area I live during the last week before cny. The problem is the mood and decision to bake for family and friends always come unplanned and impromptu.

Luckily, there were still plentiful containers sold at one of our local famous baking store, Phoon Huat. The staff was loading the containers when I reached there! This means the containers were selling like hotcakes during festive seasons. So, don't make the same mistake I did, taking things for granted.


Able to make 7 containers of pineapple tarts to be given away. A great achievement for myself as a first timer doing heavy baking of tarts alone in a few days' times. The first few trays of tarts were not turning out so good to my satisfaction as they are far too sour. To my pleasant surprise some of family members and friends prefer a little sour pineapple tarts :)

There are a lot of things to share in making the tarts, I am going to break them done one by one for easy understanding and reading. I researched a few sites and books about pineapple tarts. These are some obvious variations in terms of the different ingredients used, its volumes and techniques for the crust making:


i) Type of Flours
- Plain Flour versus cake flour
The first batch I made using strictly just cake flour. It was really soft in fact too soft to my likings. Worse still when the filling was added onto the crust, it could not take the weight for too long. Though it didn't fall upon (luckily) as days went by, it was just difficult to take one tart out from the container and I was worried to see the tarts kept sinking down! This was partly also contributed by the wet fillings and also the timing of baking. I will talk about this in the later sections.
- At the end, I used just plain flour and the result was just as good!

ii) Icing Sugar versus castor sugar
- For each pineapple recipe I just used 2 tbsp icing sugar. Some recipe will call for slightly more sugar if you prefer a slightly sweeter crust. Whenever I can I always want to reduce the sugar consumption without compromising the overall taste.
- Icing sugar will give a more softer texture as compared to castor sugar.
- This is the ingredient that you can really decide how much you want as it should follow your taste buds more than anything else.

iii) Milk powder
- I added about 4 tablespoon of milk powder to the original recipe to add punch to the flavour. If you prefer more milky flavour you may add more but not too much until it becomes another bakery product like melting moment or cookies as such!
- If you don't like this, you can just omit it totally!

iv) Custard powder
- Came across a few recipes that used a small amount of custard powder. Guess this will add to the powdery-like texture to the crust. Have not tried that and am not sure of the outcome.
- The amount used is very little like 30g custard powder to 600g flour for making 150 tarts.

v)Butter or/and Margarine
- Most of the recipes I found on the net, called for butter instead of margarine.
- Guess the obvious differences will be on the cost and whether you want your tarts to have authentic buttery flavours or not. So the choice is really yours!

vi) Eggs
- Use less egg for melt-in-the-mouth type. Most recipes call for one egg and some use only egg yolk like the one that I based on.

v) Proportion of butter to flour
- There are really a lot of recipes out there calling for different ratio of butter to flour for pineapple tarts. As a new baker I am also not sure which one is the best. My gut feelings say that it falls back again to one simple question that is what type of texture you prefer!
- If you prefer melt-in-the mouth type and very buttery flavour, you may try this ratio 1.3:1 for flour and butter which I used for the recipe and it works well. Too much butter will make your dough too soft, sticky and hard to manage. At the end you need to add more flour while rolling and cutting the dough and the calculation will fall back to the origial suggested ratio.
- If you prefer a slightly still melt-in-the-mouth type but less buttery you may try this ratio 1.8:1
- If you prefer a crunchy hard type, perhaps can try on 2 or more:1 ratio. I saw one recipe saying that it is for melt-in-the mouth type but the amount of flour used is double of the butter and the photo showed didn't convince me either!

Do feedback to me if you have tried the latter two ratio.

vi)Method of mixing the ingredients
- Rubbing-In Method : I enjoyed rubbing in the cold butter into the flour. It gave me a comfortable cooling sensation to my hands, the exact same feeling you will have when you are doing facial mask! It is so relaxing and nice :) Basically you just cut the cold butter into cubes and rub them into the flour with your finger tips not your hand until all become crumbly.
- Creaming method : This is to beat the butter with the sugar until it becomes white and light. Add flour in batches into the batter and finally add the egg slowly until well combined. I have not done this before as I enjoyed the traditional method and I heard the outcome of the tart is the same.

Variations for the pineapple fillings :

i) Fresh Pineapple fillings
- Cut the head and the tail of the pineapple and let it sit with the head up. Cut the skin vertically and once this is done remove the cores diagonally by doing a V-shaped cut to dig out the cores. Check this website ,Expert Village.
- Once the above is done, let it sit vertically again and cut into about 6 pieces and remove the stem.
- Grate it with hand grater or machine. I bought 6 honey pineapples, grated 3 with my bare hands but eventually gave up and use blender to blend the rest. Read in some blogs that it would be better to use a juicer to do this step than blender.
- In medium fire cook the blended pineapple until almost dried. This will take about 1.5hour all in all. I used high fire initially for about half and hour and stirring occasionally. I then reduced the fire to medium and continue to let it simmer until almost dry and add sugar towards the end. - Let it cool off and pop it into the fridge overnight. Scoop them using a teaspoon and roll into balls for later use.
- Two pineapples probably will yield about 25 - 30 balls of pineapple fillings.

ii) Ready-made pineapple fillings
- There are 2 brands available in the market i.e Bake King & RedMan
- I used both before and could not really tell the difference!

iii) Added spices for the fillings
- For nyonya pineapple tarts, you need to add cloves, star of anise and cinnamon to the fillings. Most of the pineapple tarts that we can get on the shelves do not have spices added.
- I personally prefer to add small amount of spices for the fillings to create a light yet fragrant aroma rather than just bland pineapple fillings with sugar... if you really know what i mean :)

iv)Pineapple cane juice
- If you are using ready-made pineapple fillings, adding in the cane juice is very important to reduce the dryness of the filling.
- You may add the spices to the cane juice and let it boil a while to bring out the aroma before adding in the paste.
- The cooking time will be much shorter but will take about half and hour. You need to use very slow fire as the ready-made pineapple fillings are rather too sticky.

v)Lemon Juice
- This is added to cut the sweetness of the fillings.

vi)Sugar
- If you are using ready-made pineapple fillings, be careful not to add too much sugar as the paste itself and the pineapple cane juice have already sugar content inside.
- For fresh pineapple fillings, adding sufficient sugar is important to make a tasty fillings. I made a mistake in this step by not adding enough sugar and the first batch of the fillings tasted rather sourish :(


1 Crust recipe can yields about 50-60 tarts

Ingredients

360g plain flour (sifted)
2 tbsp of icing sugar
280g unsalted butter
1 egg yolk lightly beaten
1 tsp pure vanilla essense
1 egg yolk lighlty beaten with a few drips of water for glazing

Method

1. Preheat oven to 180 deg C/350 deg F.
2. Rub in the butter into the flour until crumbly.
3. Add in sugar and vanilla essense and continue to knead the dough until well combined.
4. Add in the egg yolk to combine all the ingredients more easily.
5. Wrap the dough in cling wrap and put the fridge for at least 1-hour for easy handling.
6. Take half or 1/3 of the dough out and put the rest back in the fridge. Roll it to about 7mm height. Dip the pineapple tart cutter lightly in the flour to avoid stickiness. Press it onto the flatten dough and cut out the shape.
7. Line the baking tray with baking paper and use scraper to remove each tart to the baking tray.
8. Create indent in the middle of the tart by slightly press in the mould.
9. Put in the oven and bake it for about 10 minutes.
10. Remove from oven and brush the side of the tarts with egg glaze.
11. Pat a little of the rolled pineapple balls and put in the centre of the crust.
12. Fill small amount of the dough in a disposable piping bag, snip at the tip of the bag and start piping any shapes you like on top of the filling for decorations.
11. Put the tarts back into oven for another 10 minutes.
12 . Let it cool off a little while on the baking tray. Use scraper to transfer the tarts and let them cool on the wire racks.

Notes :
1. I had made 5 batches of this recipe to yield 7 containers of tarts to be given away. Each 5" (H) x 3"(D) container is able to store about 36 pieces with 6 layers. Each layer is made up of 6 pieces of open pineapple tarts.

2. I also bought a few 3.5" (H) x 4"D) containers. For this size, you may probably store about 21 pieces with 3 layers. Each layer will have 7 pieces. I am not into sales yet but all these are important learning points for future estimation.

3. I find that the taste and flavour didn't compromise much if you were to mix in an appropriate ratio of fresh pineapples with the ready-made ones. The juices from the fresh pineapples will give a natural moist and balance to the dryness of the commercial filling and therefore you may use little of the pineapple cane juice in this case. My husband loves this version of tarts instead of full fresh pineapple fillings and... me too!

4. Make sure the fillings are cooked dry and moist enough. I have not cooked my fillings to satisfaction :(

5. When putting the fillings on the dented area, try to centralise it and you won't know until you stand up to do this process rather than sitting down.

6. Use a thicker piping bag or featherweight type for piping designs on the fillings, otherwise the normal piping bag will burst easily. Also add a little water to the crust dough for this purpose to thin the consistency. You may brush the designs with egg glaze too before popping them back to the oven for the last 10 mintues.

7. Make the fillings ahead of time!

Tuesday, January 20, 2009

Pineapple Tarts


I first experimented making pineapple tarts last year out of curiosity. I visited a few blogs and read numerous times on their experiments and outcomes. I watched a few Youtube videos on how to make the fillings and crust and they are so helpful! At the end, I did not follow any recipes strictly. There are many ways to make the pineapple crusts and I and my husband prefer melt in the mouth type rather than crunchy or biscuit-like type like Nyonya Pineapple tarts. Some recipes looked almost similar but different by one or two ingredients or by a little variation on the amount of butter or type of flour used. I wasn't confused but just wasn't sure which recipe to follow. I think home bakers can be at times overwhelmed and spoilt by many choices and information available at no cost on the Internet.

I decided to use Oi Lin's pienapple tarts recipe as the base and did modification from there. I made 4 different shapes of tarts for experiments i.e the open pineapple tarts, the tangerine style pineapple tarts, the apple-shape tarts and the roll type as you can see in the picture below!


I will pose my refined recipe and my learning points once I have done the production later this week just before CNY. I have cooked the pineapple fillings today and am ready to bake the tarts this Wednesday! The two photos posted were taken last year. Very excited and anticipating a tiring day ahead. Planning to do 'Kok Chai' this year just for my dad for this is a must have chinese new year goodies every year and the challenge is I have never made that before!! Crossing my fingers and researching a lot on that as well. Do look out for the posts soon in my blog!
Related Posts Widget for Blogs by LinkWithin